Know the Steps to Check Corrupted Drivers
Here are the steps you need to check and install Windows drivers. After following this step-by-step process, you will get rid of the system errors.
1. Open the Command prompt and search for verifier in CMD. In case you need steps to open the command prompt, here they are.
- Click on the Windows logo icon.
- Type cmd.
- Choose Command Prompt from the list that appears.
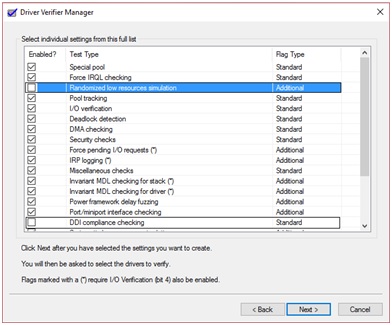
2. After running the above command, a new window, named, driver verifier manager will pop up on the screen. From that window, choose Create Custom Settings. Then, click on next.
3. Now, you will see a list of tests on the screen. Simply select all the tests except DDI Compliance Checking and Randomized Low Resources Stimulation.
4. After you have selected all the tests and clicked on next, a window will appear. Do not change anything here. Simply click on the Next button.
5. Now choose “select driver names from a list” from the window that appears. After doing this, click on next.
6. Wait for the system to load the driver’s information.
7. You will see a window containing all the drivers. If you are not aware of the faulty driver, then choose all drivers. However, since the Microsoft drivers are the uncorrupted ones, do not select them. In case you know which is the corrupt driver, click on it.
8. After you’ve selected all the drivers and clicked finish, the system will start again. Once it restarts and the driver verifier gets activated, you can continue working as usual. If any errors are found, then you’ll see a blue screen. Take note of the error and its cause from the screen.
Now that you know the corrupted driver, you can either update it to the latest version using the best driver updater available online or delete and reinstall it. In case you opt for the second option, i.e., reinstalling the drivers, here are the steps to do it.
Steps to Delete and Reinstall the Driver
Here’re the steps through which you can delete the corrupted driver and install a new one quickly.
1. Open Device Manager and find the hardware having a corrupt driver.
2. Right-click the hardware’s name and choose Properties from the menu that appears.
3. From the window that appears, choose Driver Tab. Then, click on Uninstall Device.
4. After clicking on uninstall device, you will see a window. Check the box saying “Delete the driver software for this device” and click on Uninstall.
5. Now that you have uninstalled the corrupted driver visit the manufacturer’s website to reinstall it.
6. From the website, download the driver’s latest version.
7. Right-click on the driver installation program and select Extract All to unzip its contents.
8. Open Device Manager.
9. Click on the hardware missing a driver.
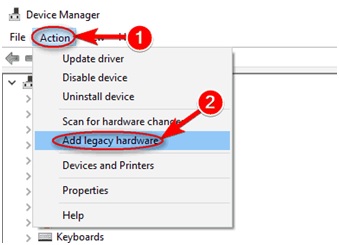
10. After you have clicked on the hardware, choose Action from the menu bar. And, then select Add Hardware Legacy.
Now, all that you are required to do is, sit back and relax as the Add Hardware Legacy wizard guides you through the process of installing the driver.
Install the driver, and do not leave it just like that forever. Keep on updating it regularly so that your system works all the time snappily, and you do not encounter any errors. Talking about the updates, keeping the drivers up to date is also an easy task. But, if you feel lazy to update them, then here are the reasons due to which they must be updated.
- To speed up the system’s performance.
- To get rid of troubles such as the Blue Screen of Death.
Hopefully, this post has made it easy for you to check for the corrupted drivers, reinstall, and update them. Lastly, signing off with the suggestion that always use the correct drivers for the hardware components. Otherwise, a lot of system lags are awaiting you.


